TruUcde Rabbithole 02/12 : Testing & Tooling Concepts

In the first post of this series I outlined the development of a very simple plugin. In that post I began to descend into the rabbit hole of testing and in rapid succession rattled off a bunch of stuff I used.
As I thought about that post it occurred to me that I was about to make the some of the same mistakes that many tutorial writers make. A couple of the big ones are:
So, I’m going to try for a different approach here. Of importance in testing, and development generally, is what is sometimes called “tooling”. In other words, you usually need to install some tools (that work together) to perform the tasks that you intend to undertake. What I’ll do in this article is look at the tools I used to do my testing, why I chose them and some implications of how to use them.
I’ll start with a disclaimer, I’m not an expert at this stuff, far from it. I did manage to get some things to work though. I also met with some frustrations along the way, so my underlying aim is to reduce the frustration of the 2 or 3 people who will actually read this on the way to set up for testing. I will also digress into some conceptual nuggets that are also important.
With respect to the tools, each one of them has documentation and require usage skills in their own right. What I’ll typically do is point to their documentation and identify key things to know and consider to get going with the tool at a basic level. We’ll look at the tools and background information in this post and actually install them further along in this series.
Installing stuff & related concepts
You will need to install some stuff to do testing. This is a little different than installing typical desktop software. We will be doing this stuff from the command line. The first two issues concern where and how to install things. I’ll be referring back to these concepts as I proceed through this post.
I will be writing from a Linux/MacOs perspective. They are both linuxy on the command line, and the majority of relevant development material and tools are written for these environments. If you are using Windows the best advice I can give is to install Ubuntu linux via the Windows store and work in the linux command line. Complete directions are here.
Context
Context will be a broad theme that will reappear throughout this series. Code runs (including testing code) in a context: operating system, hardware, environment such as WordPress, and specific of that environment such as user, site, capabilities, plugins, themes, etc. Additionally, there will be elements of the operating environment that will affect running code.
The more we can be aware of, and plan within, relevant contexts the better. We will look at unit testing, which seeks to isolate code from as much context as possible, and integration test, which seeks to run code within a context.
Our tooling setup also has some contextual considerations which we will look at first.
Global vs. Project
Before we install anything, let’s consider the scope of installing things. Global is installing on a machine-wide basis (rather than limited to a project directory). Typically the installation will occur in such a way that whatever you install is available across multiple projects and will probably be added to your path so that you can get at it everywhere. This is certainly the most convenient, but also has the greatest potential for conflicts and disaster down the road.
There are several advantages to install things on a project basis, the key one being that things are contained. The stuff you install for one project won’t affect the state of other projects. Also, as we will see below when we talk about Composer, if you share your project using a project-based install it will make it easy for others to install the same stuff you used, and the same versions.
Versions & Dependencies
For the stuff we will be installing there is an underlying philosophy at work. Each thing tends to serve a single or very small number of purposes. Often it will require other things that also each serve a single or very small number of purposes. These are called dependencies. Each thing can be installed on its own or as a dependency of something else and it is easy to acquire quite a pile of them in a project.
Also, each item has a version (much like other software has version numbers, or sometimes names). As an item is developed, it is developed against specific versions of its dependencies. This means that it is not only dependent on an item, but on some set of its versions (you’ll often see a particular version or range of versions specified.)
One of the issues to protect against is having two different versions of a package available in the same scope. By this I mean that code you are writing has access to two different versions of something. This is why we install locally (project-based) as much as we can. Also, global packages will not be listed in the composer.json file (more about that below), so if you share a project there will be an unlisted dependency that might foul up others.
Also, if your packages are installed globally and you then upgrade them it could mess up your own previous work that depends on the versions you created this work with.
A good many providers believe that their package is of such great importance that it should be installed globally, most shouldn’t. A good general principle is to install globally as close to nothing as you can.
Packages and Composer
The unit of thing that you will be installing is typically called a “package” and there are a number of ways of installing them. The stuff we are looking at here are PHP packages, as is a good chunk of WordPress.
The first tool we will look at is Composer. It’s project website is here: https://getcomposer.org/
Have a look at the Getting Start page. It gives a description of some of the issues I describe above along with installation instructions for various systems. Note that the instructions are different for local vs. global installs. The examples I’ll give in this post are Mac based, but would also apply to linux.
My best recommendation if you are on a Windows machine is to install the linux subsystem and work in linux. The easiest way is to go to the Microsoft store item in Windows, search for Ubuntu (a popular linux distribution) and follow the instructions in the description.
Composer is one of the few things I install globally. It makes starting projects easier and manages the dependency chain rather than participating in it, so it’s relatively safe to install globally. Also, it comes with its own self-update command to keep it current.
Types of tests
I know I briefly mentioned unit testing and integration testing in the first post of this series, but it is useful to review the different types of testing and their roles before we start looking at tooling. Different people understand these types of testing differently, this is my blog post, so this is the way I understand them. The other thing worth noting is that there is universal agreement that you only need to test the code you’ve written. The assumption is that outside code is assumed to be sound and already tested. (What could possibly go wrong.)
We are going to look at the first two types of testing in this article series and associated tooling. We’ll start in this post with the tooling for unit testing.
Testing packages
There are some key packages that we will need. When we require such core pieces it’s a good idea to check them all out before installing them.
PHPUnit: this is the defacto standard for PHP unit testing and will provide the basis for our tests. Here is where information on PHPUnit can be found: https://phpunit.de/. You can see from the announcements that a new major version of PHPUnit seems to be released in February of each year. At the time of writing PHPUnit 9 is the current version. But don’t install it yet, let’s look at what else we need.
WPMock: this is a package that “extends” PHPUnit to provide handy features for “Mocking” WordPress functions. I briefly describe mocking in the previous article of the series and we’ll see it in action in an upcoming article, so I won’t go into further detail here. But I do want to address the concept of “extending” briefly below. Before we continue, let’s have a look at the WPMock information: https://github.com/10up/wp_mock.
This package lives in a github repository, or repo for short. If you are not familiar with github it can be a bit imposing at first. It is a website used for storing and tracking changes to code. The actual code for most of the packages we will install lives on github.
There are two parts to the screen, the top is a listing of the code files. The bottom part contains a render of the README.md file which typically contains instructions. We’ll return to these shortly.
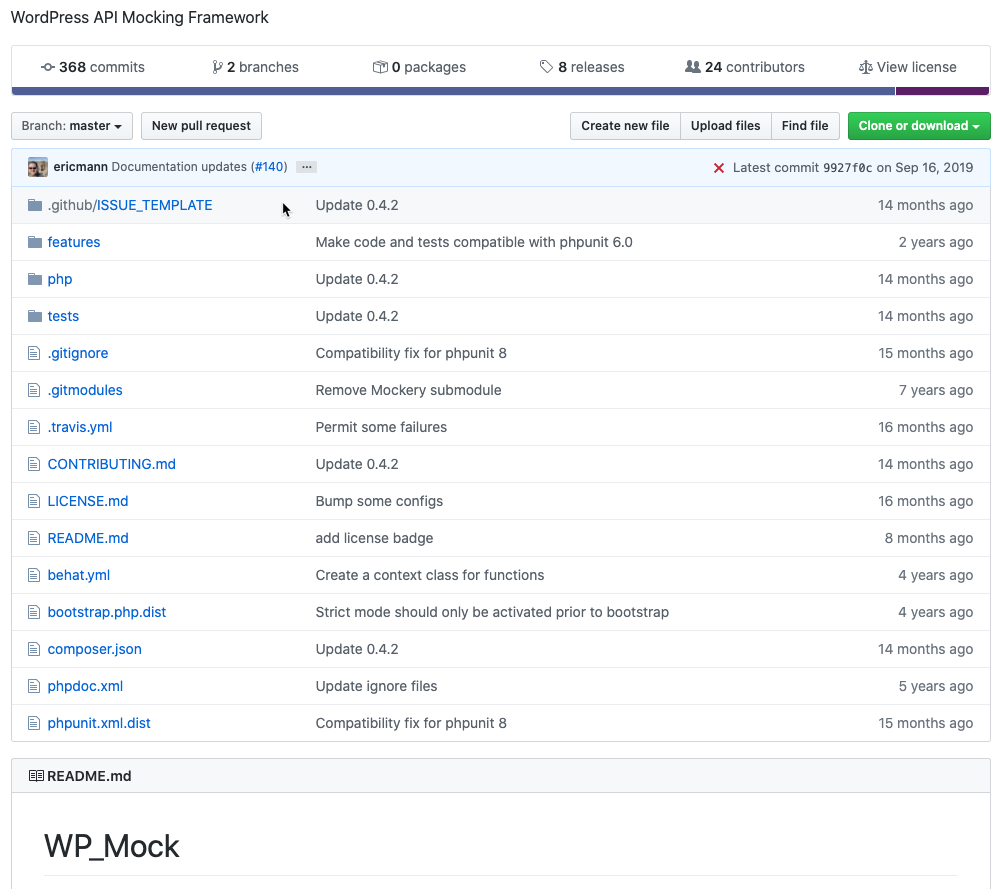
While I’m checking out the major pieces I’m going to use I am curious about versions and updates and that sort of thing. On the right side of the github window, in the blue horizontal bar, it tells me that the last activity on this repo was Sept. 16, 2019. A little over 6 to 8 months ago at the time of writing. Below that I can see the last time each file or directory was changed. A set of changes in github is known as a commit. Commits are each logged with a message describing the changes. We can see that several files/directories contain the message “Update 0.4.2”, which will represent a version number. I’m going to take a brief side trip to look at how this type of numbering works. It is important to know.
Semantic Versioning
This type of versioning takes the form: major.minor.patch
MAJOR version when you make incompatible API changes,
MINOR version when you add functionality in a backwards compatible manner, and
PATCH version when you make backwards compatible bug fixes.
https://semver.org/
These version numbers are not decimal numbers. You could conceivably find something like: 5.23.16
So, in the github repo I might also check the releases list/link.
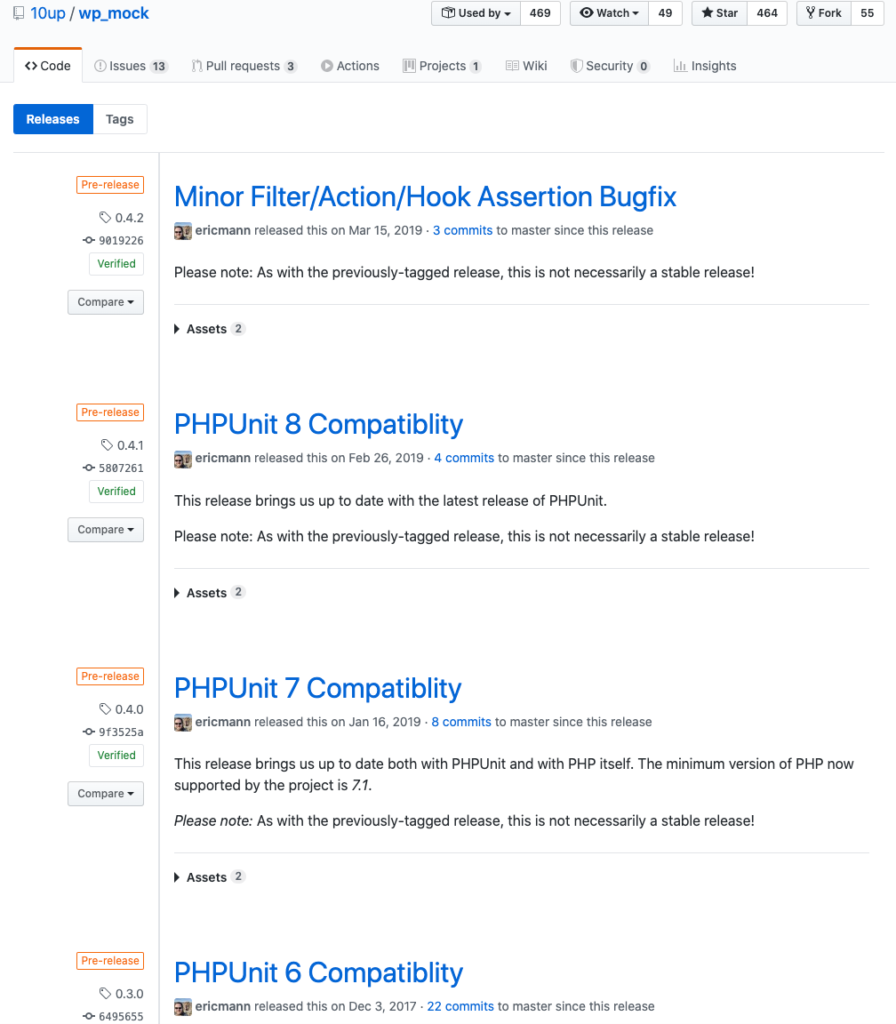
So, version 0.4.2 is a bugfix, and before that version 0.4.1 is a PHPUnit 8 Compatibility release. This tells me that I can’t use the latest PHPUnit which is version 9, I have to use version 8 instead, maybe.
We don’t need it until we do our integration testing, but we might as well have a look now at what the WordPress Unit (actually integration) Testing Suite has for requirements.
This is installed a little differently from the other items. It uses the WordPress Command line interface (WP-CLI) and its scaffold command: https://github.com/wp-cli/scaffold-command. There are some more documentation here: https://make.wordpress.org/cli/handbook/misc/plugin-unit-tests/.
Version requirements are a bit difficult to track down, however, I did find this article:
https://jonathanbossenger.com/unit-tests-for-your-wordpress-plugin-using-wp-cli-and-phpunit/
which points to this entry on the WordPress dev site:
https://make.wordpress.org/core/handbook/testing/automated-testing/phpunit/
which refers to this code update ticket:
https://core.trac.wordpress.org/ticket/46149.
Anyway, the upshot is that we need to stick with PHPUnit 7.x. I discovered this after I got a bunch of errors with PHPUnit 8.x and was searching to see what they meant and how to fix them.
We’ll go through installing this stuff in future articles in this series.
Linters
The final things we are going to install are: a linter and some WordPress-specific rules for that linter. So what’s a linter? A linter examines your code against some formatting rules before you run it or test it. Preferable, if you are using a Integrated Development Environment (IDE) it does this during the writing/editing process.
I know it doesn’t sound particularly fascinating, but I recall a day before I used linters. I spent 6 hours trying to debug my code which was throwing an error. It turns out that I had a colon instead of a semicolon at the end of one of my lines of code. Hard to spot sometimes. A linter would have caught it right away.
PHP Code Sniffer (phpcs) is the defacto standard in the PHP world. https://github.com/squizlabs/PHP_CodeSniffer. It has a companion tool, phpbf, for fixing errors. These can be integrated with popular IDEs.
As a final piece we need some standards for phpcs to use. WordPress has identified coding standards for use with WordPress things. Such standards basically define how the code is organized, presented and crafted. This enables all members of the WordPress community to craft their code in similar ways and standardize the way code is presented. https://codex.wordpress.org/WordPress_Coding_Standards.
Coding standards don’t make for very gripping reading, but it is worth at least skimming them (just do the PHP ones for now) to see what types of things are there.
https://github.com/WordPress/WordPress-Coding-Standards contains a package that plugs the WP Coding standards into PHP Code Sniffer.
But wait, there’s more. Today’s special bonus is another package that does the configuring of the WordPress Coding Standards into Code Sniffer for you. It’s called PHP_CodeSniffer Standards Composer Installer Plugin. https://github.com/DealerDirect/phpcodesniffer-composer-installer.
Okay, one more thing since that last one one was so popular. Another set of sniffer standards, PHPCompatibilityWP. https://github.com/PHPCompatibility/PHPCompatibilityWP.
This one checks your code for removed or deprecated PHP.
Enough already!
Okay, that should give us what we need. It is worth noting that this last bunch of stuff, phpcs and the standards packages are what we need for actual code, and the first few items, PHPUnit, WP Mock and the WordPress Unit Testing framework are what we need to test code.
In the next article, we’ll look at some development environment recommendations and then we’ll get the unit testing stuff installed and ready to go.